历史文章/不再维护

在二维平面模拟三体运动(附Python代码)

三体一般来说没有解析解,只有几个特殊的初始条件才有解析解。数值解相对来说就比较简单了,只要套用万有引力公式即可,于是就试着写了下。这篇只考虑在二维平面上的情况,一是画图会比较简单,二是观看动画时不会显得太乱。其实,在二维平面上,已经就可以看到三体运动轨迹的复杂性了。一般来说,如果初始速度为零,在万有引力的作用下,三体的运动轨迹就是在一个平面内(这里给的程序可以修改初始速度,但也只是考虑在平面内的初速度)。

“数值解的误差也受计算步长的影响,计算步长越小越精确,但是因为数据一定会有精度,并不能真正的无穷小,所以实际上在时间足够长以后依旧会产生很大的误差”[1]。

说明:这边代码不是实时预览的。因为一次的计算时长比较长,所以直接保存为JPG图片或GIF动画文件会更好些。其实更好的数据保存格式应该是文本格式,保存所有计算结果的坐标,之后如果需要修改动画样式时,可以不需要重新计算。
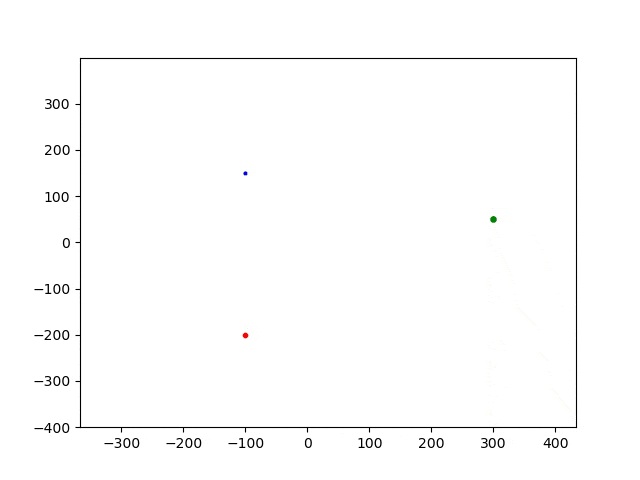
1. 三体的质量相差不大的情况

代码如下(初始条件可以修改。这里的步长设为0.1秒,如果缩小步长,过一段时间后轨迹会完全不同,步长越小越精确 )。

"""
This code is supported by the website: https://www.guanjihuan.com
The newest version of this code is on the web page: https://www.guanjihuan.com/archives/858
"""

import numpy as np
import matplotlib.pyplot as plt
import os
# os.chdir('E:/data')  # 设置路径

# 万有引力常数
G = 1

# 三体的质量
m1 = 15  # 绿色
m2 = 12  # 红色
m3 = 8  # 蓝色

# 三体的初始位置
x1 = 300  # 绿色
y1 = 50
x2 = -100  # 红色
y2 = -200
x3 = -100  # 蓝色
y3 = 150

# 三体的初始速度
v1_x = 0  # 绿色
v1_y = 0
v2_x = 0  # 红色
v2_y = 0
v3_x = 0  # 蓝色
v3_y = 0

# 步长
t = 0.1

plt.ion()  # 开启交互模式
observation_max = 100  # 视线范围初始值
x1_all = [x1]  # 轨迹初始值
y1_all = [y1]
x2_all = [x2]
y2_all = [y2]
x3_all = [x3]
y3_all = [y3]

i0 = 0
for i in range(1000000):  
    distance12 = np.sqrt((x1-x2)**2+(y1-y2)**2)   # 物体1和物体2之间的距离
    distance13 = np.sqrt((x1-x3)**2+(y1-y3)**2)   # 物体1和物体3之间的距离
    distance23 = np.sqrt((x2-x3)**2+(y2-y3)**2)   # 物体2和物体3之间的距离
    
    # 对物体1的计算
    a1_2 = G*m2/(distance12**2)  # 物体2对物体1的加速度(用上万有引力公式)
    a1_3 = G*m3/(distance13**2)  # 物体3对物体1的加速度
    a1_x = a1_2*(x2-x1)/distance12 + a1_3*(x3-x1)/distance13  # 物体1受到的水平加速度
    a1_y = a1_2*(y2-y1)/distance12 + a1_3*(y3-y1)/distance13  # 物体1受到的垂直加速度
    v1_x = v1_x + a1_x*t  # 物体1的速度
    v1_y = v1_y + a1_y*t  # 物体1的速度
    x1 = x1 + v1_x*t  # 物体1的水平位置
    y1 = y1 + v1_y*t  # 物体1的垂直位置
    x1_all = np.append(x1_all, x1)  # 记录轨迹
    y1_all = np.append(y1_all, y1)  # 记录轨迹
    
    # 对物体2的计算
    a2_1 = G*m1/(distance12**2)
    a2_3 = G*m3/(distance23**2)
    a2_x = a2_1*(x1-x2)/distance12 + a2_3*(x3-x2)/distance23
    a2_y = a2_1*(y1-y2)/distance12 + a2_3*(y3-y2)/distance23
    v2_x = v2_x + a2_x*t
    v2_y = v2_y + a2_y*t
    x2 = x2 + v2_x*t
    y2 = y2 + v2_y*t
    x2_all = np.append(x2_all, x2)
    y2_all = np.append(y2_all, y2)
    
    # 对物体3的计算
    a3_1 = G*m1/(distance13**2)
    a3_2 = G*m2/(distance23**2)
    a3_x = a3_1*(x1-x3)/distance13 + a3_2*(x2-x3)/distance23
    a3_y = a3_1*(y1-y3)/distance13 + a3_2*(y2-y3)/distance23
    v3_x = v3_x + a3_x*t
    v3_y = v3_y + a3_y*t
    x3 = x3 + v3_x*t
    y3 = y3 + v3_y*t
    x3_all = np.append(x3_all, x3)
    y3_all = np.append(y3_all, y3)

    # 选择观测坐标
    axis_x = np.mean([x1, x2, x3])  # 观测坐标中心固定在平均值的地方
    axis_y = np.mean([y1, y2, y3])  # 观测坐标中心固定在平均值的地方
    while True:
        if np.abs(x1-axis_x) > observation_max or np.abs(x2-axis_x) > observation_max or np.abs(x3-axis_x) > observation_max or\
        np.abs(y1-axis_y) > observation_max or np.abs(y2-axis_y) > observation_max or np.abs(y3-axis_y) > observation_max:
            observation_max = observation_max * 2  # 有一个物体超出视线时,视线范围翻倍
        elif np.abs(x1-axis_x) < observation_max/10 and np.abs(x2-axis_x) < observation_max/10 and np.abs(x3-axis_x) < observation_max/10 and\
        np.abs(y1-axis_y) < observation_max/10 and np.abs(y2-axis_y) < observation_max/10 and np.abs(y3-axis_y) < observation_max/10:
            observation_max = observation_max / 2   # 所有物体都在的视线的10分之一内,视线范围减半
        else:
            break

    plt.axis([axis_x-observation_max, axis_x+observation_max, axis_y-observation_max,  axis_y+observation_max])
    
    plt.plot(x1, y1, 'og', markersize=m1*100/observation_max)  # 默认密度相同,质量越大的,球面积越大。视线范围越宽,球看起来越小。
    plt.plot(x2, y2, 'or', markersize=m2*100/observation_max) 
    plt.plot(x3, y3, 'ob', markersize=m3*100/observation_max)
    plt.plot(x1_all, y1_all, '-g')  # 画轨迹
    plt.plot(x2_all, y2_all, '-r')
    plt.plot(x3_all, y3_all, '-b')

    # plt.show()  # 显示图像
    # plt.pause(0.00001)  # 暂停0.00001,防止画图过快

    if np.mod(i, 500) == 0:  # 当运动明显时,把图画出来
        print(i0)
        plt.savefig(str(i0)+'.jpg')  # 保存为图片可以用来做动画
        i0 += 1
    plt.clf()   # 清空

步长为0.1时,运行结果为:

步长为0.05,运行结果为:

可以看出:随着步长减小,运动轨迹发生了变化。实际的物理运动路径应该是步长小的计算结果。

2. 考虑其中有一个球相对较大的情况

参数为:

# 三体的质量
m1 = 3  # 绿色
m2 = 100  # 红色
m3 = 10  # 蓝色

# 三体的初始位置
x1 = 0 # 绿色
y1 = -100
x2 = 0  # 红色
y2 = 0
x3 = 0  # 蓝色
y3 = 50

# 三体的初始速度
v1_x = 1  # 绿色
v1_y = 0
v2_x = 0  # 红色
v2_y = 0
v3_x = 2  # 蓝色
v3_y = 0

步长为0.1时,结果为:

步长为0.05时,结果为:

选取两种步长,前面运动轨迹基本上相同。当误差逐步积累到一定程度时,轨迹则变得完全不同。

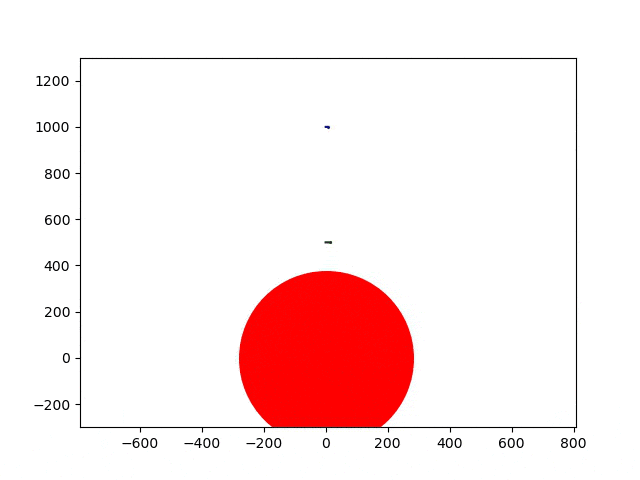
3. 某个球修改为大质量,模拟恒星-行星系统。

参数为:

# 三体的质量
m1 = 10  # 绿色
m2 = 1000  # 红色
m3 = 10  # 蓝色

# 三体的初始位置
x1 = 0  # 绿色
y1 = 500
x2 = 0  # 红色
y2 = 0
x3 = 0 # 蓝色
y3 = 1000

# 三体的初始速度
v1_x = 1.5  # 绿色
v1_y = 0
v2_x = 0  # 红色
v2_y = 0
v3_x = 0.8  # 蓝色
v3_y = 0

步长为0.1时,结果为:

步长为0.05时,结果略。

更多参数的情况可以自行计算,计算还是挺费时间的,一个动图的时间都是一小时以上。关于相撞问题,直观感觉是:在某些条件下,三体会发生相撞,而在另外某些条件下,则永不发生相撞,即三体的稳定性问题。这个问题具体没有研究过,这里只是把三体当成质点,考虑没有体积或者体积很小的情况,不考虑相撞的问题。

制作动画的代码如下:

import imageio
import numpy as np
import os
# os.chdir('E:/data')  # 设置文件读取和保存位置

images = []
for i in range(1000):
    image = str(i)+'.jpg'
    im = imageio.imread(image)
    images.append(im)
imageio.mimsave("a.gif", images, 'GIF', duration=0.1)  # durantion是延迟时间

运行该代码把上面代码生成保存的.jpg图片制作成动画.gif。 制作完GIF之后可以用网站https://www.iloveimg.com/zh-cn或其他网站/软件把.gif图像压缩成更小的体积。画质会在一定程度上会变差,可根据需要进行压缩。

参考资料:

[1] https://www.jianshu.com/p/d1a56bf54a6c

9,915 次浏览

【说明:本站主要是个人的一些笔记和代码分享,内容可能会不定期修改。为了使全网显示的始终是最新版本,这里的文章未经同意请勿转载。引用请注明出处:https://www.guanjihuan.com

28 thoughts on “在二维平面模拟三体运动(附Python代码)”

    1. 有两个可能的原因:(1)可能解就是这样的,由于速度比较大,且方向相反,会导致距离越来越远,引力越来越小。(2)也可能是计算错误。越往后面计算,误差越大,可能是误差积累导致的结果偏离真实情况。

  1. 修改了部分代码,增加了几个取值,去除了保存图片,改为动态显示,以及调整了几个参数让整个系统可以动态运行,目前还没统计运行了多久,反正很久,感兴趣的可以运行看看

    
    import numpy as np
    import matplotlib.pyplot as plt
    import os
    
    # 万有引力常数
    G = 0.5
    
    # 三体的质量
    m1 = 7 # 绿色
    m2 = 15 # 红
    m3 = 8  # 蓝色
    
    # 三体的初始位置
    x1 = 100  # 绿色
    y1 = 0
    
    x2 = 0  # 红色
    y2 = 0
    
    x3 = 150  # 蓝色
    y3 = 0
    
    # 三体的初始速度
    v1_x = -0.1  # 绿色
    v1_y = -0.3
    v2_x = 0  # 红色
    v2_y = 0
    v3_x = 0 # 蓝色
    v3_y = 0.3
    
    # 步长
    t = 3
    
    plt.ion()  # 开启交互模式
    observation_max = 100  # 视线范围初始值
    x1_all = [x1]  # 轨迹初始值
    y1_all = [y1]
    x2_all = [x2]
    y2_all = [y2]
    x3_all = [x3]
    y3_all = [y3]
    
    i = 0
    for i in range(1000000):  
        distance12 = np.sqrt((x1-x2)**2+(y1-y2)**2)   # 物体1和物体2之间的距离
        distance13 = np.sqrt((x1-x3)**2+(y1-y3)**2)   # 物体1和物体3之间的距离
        distance23 = np.sqrt((x2-x3)**2+(y2-y3)**2)   # 物体2和物体3之间的距离
        old_x1 = x1
        old_x2 = x2
        old_x3 = x3
        old_y1 = y1
        old_y2 = y2
        old_y3 = y3
        # 对物体1的计算
        a1_2 = G*m2/(distance12**2)  # 物体2对物体1的加速度(用上万有引力公式)
        a1_3 = G*m3/(distance13**2)  # 物体3对物体1的加速度
        a1_x = a1_2*(old_x2-x1)/distance12 + a1_3*(old_x3-x1)/distance13  # 物体1受到的水平加速度
        a1_y = a1_2*(old_y2-y1)/distance12 + a1_3*(old_y3-y1)/distance13  # 物体1受到的垂直加速度
        v1_x = v1_x + a1_x*t  # 物体1的速度
        v1_y = v1_y + a1_y*t  # 物体1的速度
        x1 = x1 + v1_x*t  # 物体1的水平位置
        y1 = y1 + v1_y*t  # 物体1的垂直位置
        x1_all = np.append(x1_all, x1)  # 记录轨迹
        y1_all = np.append(y1_all, y1)  # 记录轨迹
        
        # 对物体2的计算
        a2_1 = G*m1/(distance12**2)
        a2_3 = G*m3/(distance23**2)
        a2_x = a2_1*(old_x1-x2)/distance12 + a2_3*(old_x3-x2)/distance23
        a2_y = a2_1*(old_y1-y2)/distance12 + a2_3*(old_y3-y2)/distance23
        v2_x = v2_x + a2_x*t
        v2_y = v2_y + a2_y*t
        x2 = x2 + v2_x*t
        y2 = y2 + v2_y*t
        x2_all = np.append(x2_all, x2)
        y2_all = np.append(y2_all, y2)
        
        # 对物体3的计算
        a3_1 = G*m1/(distance13**2)
        a3_2 = G*m2/(distance23**2)
        a3_x = a3_1*(old_x1-x3)/distance13 + a3_2*(old_x2-x3)/distance23
        a3_y = a3_1*(old_y1-y3)/distance13 + a3_2*(old_y2-y3)/distance23
        v3_x = v3_x + a3_x*t
        v3_y = v3_y + a3_y*t
        x3 = x3 + v3_x*t
        y3 = y3 + v3_y*t
        x3_all = np.append(x3_all, x3)
        y3_all = np.append(y3_all, y3)
    
        # 选择观测坐标
        axis_x = np.mean([x1, x2, x3])  # 观测坐标中心固定在平均值的地方
        axis_y = np.mean([y1, y2, y3])  # 观测坐标中心固定在平均值的地方
        while True:
            if np.abs(x1-axis_x) > observation_max or np.abs(x2-axis_x) > observation_max or np.abs(x3-axis_x) > observation_max or\
            np.abs(y1-axis_y) > observation_max or np.abs(y2-axis_y) > observation_max or np.abs(y3-axis_y) > observation_max:
                observation_max = observation_max * 2  # 有一个物体超出视线时,视线范围翻倍
            elif np.abs(x1-axis_x) < observation_max/10 and np.abs(x2-axis_x) < observation_max/10 and np.abs(x3-axis_x) < observation_max/10 and\
            np.abs(y1-axis_y) < observation_max/10 and np.abs(y2-axis_y) < observation_max/10 and np.abs(y3-axis_y) < observation_max/10:
                observation_max = observation_max / 2   # 所有物体都在的视线的10分之一内,视线范围减半
            else:
                break
    
        plt.axis([axis_x-observation_max, axis_x+observation_max, axis_y-observation_max,  axis_y+observation_max])
        
        plt.plot(x1, y1, 'og', markersize=m1*100/observation_max)  # 默认密度相同,质量越大的,球面积越大。视线范围越宽,球看起来越小。
        plt.plot(x2, y2, 'or', markersize=m2*100/observation_max) 
        plt.plot(x3, y3, 'ob', markersize=m3*100/observation_max)
        plt.plot(x1_all, y1_all, '-g')  # 画轨迹的
        plt.plot(x2_all, y2_all, '-r')
        plt.plot(x3_all, y3_all, '-b')
    
        if len(x2_all)==1000 or len(y2_all)==1000:
            x1_all = np.delete(x1_all, [0]) #清除旧尾迹
            x2_all = np.delete(x2_all, [0])
            x3_all = np.delete(x3_all, [0])
            y1_all = np.delete(y1_all, [0])
            y2_all = np.delete(y2_all, [0])
            y3_all = np.delete(y3_all, [0])
            if len(plt.get_fignums())==0:
                break
    
        plt.pause(0.001)  # 暂停0.00001,防止画图过快
        if len(plt.get_fignums())==0:
            break
    
        plt.clf()   # 清空
    

    1. 嗯,Python效率不高,可以试着对Python程序做优化。如果需要大量计算,建议用C语言或Fortran语言重写下程序。

      1. 我优化了你取值出现的小瑕疵,你可以加进去试试看

        
            distance12 = np.sqrt((x1-x2)**2+(y1-y2)**2)   # 物体1和物体2之间的距离
            distance13 = np.sqrt((x1-x3)**2+(y1-y3)**2)   # 物体1和物体3之间的距离
            distance23 = np.sqrt((x2-x3)**2+(y2-y3)**2)   # 物体2和物体3之间的距离
            old_x1 = x1
            old_x2 = x2
            old_x3 = x3
            old_y1 = y1
            old_y2 = y2
            old_y3 = y3
            # 对物体1的计算
            a1_2 = G*m2/(distance12**2)  # 物体2对物体1的加速度(用上万有引力公式)
            a1_3 = G*m3/(distance13**2)  # 物体3对物体1的加速度
            a1_x = a1_2*(old_x2-x1)/distance12 + a1_3*(old_x3-x1)/distance13  # 物体1受到的水平加速度
            a1_y = a1_2*(old_y2-y1)/distance12 + a1_3*(old_y3-y1)/distance13  # 物体1受到的垂直加速度
            v1_x = v1_x + a1_x*t  # 物体1的速度
            v1_y = v1_y + a1_y*t  # 物体1的速度
            x1 = x1 + v1_x*t  # 物体1的水平位置
            y1 = y1 + v1_y*t  # 物体1的垂直位置
            x1_all = np.append(x1_all, x1)  # 记录轨迹
            y1_all = np.append(y1_all, y1)  # 记录轨迹
            
            # 对物体2的计算
            a2_1 = G*m1/(distance12**2)
            a2_3 = G*m3/(distance23**2)
            a2_x = a2_1*(old_x1-x2)/distance12 + a2_3*(old_x3-x2)/distance23
            a2_y = a2_1*(old_y1-y2)/distance12 + a2_3*(old_y3-y2)/distance23
            v2_x = v2_x + a2_x*t
            v2_y = v2_y + a2_y*t
            x2 = x2 + v2_x*t
            y2 = y2 + v2_y*t
            x2_all = np.append(x2_all, x2)
            y2_all = np.append(y2_all, y2)
            
            # 对物体3的计算
            a3_1 = G*m1/(distance13**2)
            a3_2 = G*m2/(distance23**2)
            a3_x = a3_1*(old_x1-x3)/distance13 + a3_2*(old_x2-x3)/distance23
            a3_y = a3_1*(old_y1-y3)/distance13 + a3_2*(old_y2-y3)/distance23
            v3_x = v3_x + a3_x*t
            v3_y = v3_y + a3_y*t
            x3 = x3 + v3_x*t
            y3 = y3 + v3_y*t
            x3_all = np.append(x3_all, x3)
            y3_all = np.append(y3_all, y3)
        

        1. 然后去掉整个输出图片的循环
          加上

          
              if len(plt.get_fignums())==0:
                  break


          以及改plt.pause(0.001)
          这样子就可以实时显示

      2. 
        import numpy as np
        import matplotlib.pyplot as plt
        import os
        
        # 万有引力常数
        G = 0.5
        
        # 三体的质量
        m1 = 7 # 绿色
        m2 = 15 # 红
        m3 = 8  # 蓝色
        
        # 三体的初始位置
        x1 = 100  # 绿色
        y1 = 0
        
        x2 = 0  # 红色
        y2 = 0
        
        x3 = 150  # 蓝色
        y3 = 0
        
        # 三体的初始速度
        v1_x = -0.1  # 绿色
        v1_y = -0.3
        v2_x = 0  # 红色
        v2_y = 0
        v3_x = 0 # 蓝色
        v3_y = 0.3
        
        # 步长
        t = 3
        
        plt.ion()  # 开启交互模式
        observation_max = 100  # 视线范围初始值
        x1_all = [x1]  # 轨迹初始值
        y1_all = [y1]
        x2_all = [x2]
        y2_all = [y2]
        x3_all = [x3]
        y3_all = [y3]
        
        i = 0
        for i in range(1000000):  
            distance12 = np.sqrt((x1-x2)**2+(y1-y2)**2)   # 物体1和物体2之间的距离
            distance13 = np.sqrt((x1-x3)**2+(y1-y3)**2)   # 物体1和物体3之间的距离
            distance23 = np.sqrt((x2-x3)**2+(y2-y3)**2)   # 物体2和物体3之间的距离
            old_x1 = x1
            old_x2 = x2
            old_x3 = x3
            old_y1 = y1
            old_y2 = y2
            old_y3 = y3
            # 对物体1的计算
            a1_2 = G*m2/(distance12**2)  # 物体2对物体1的加速度(用上万有引力公式)
            a1_3 = G*m3/(distance13**2)  # 物体3对物体1的加速度
            a1_x = a1_2*(old_x2-x1)/distance12 + a1_3*(old_x3-x1)/distance13  # 物体1受到的水平加速度
            a1_y = a1_2*(old_y2-y1)/distance12 + a1_3*(old_y3-y1)/distance13  # 物体1受到的垂直加速度
            v1_x = v1_x + a1_x*t  # 物体1的速度
            v1_y = v1_y + a1_y*t  # 物体1的速度
            x1 = x1 + v1_x*t  # 物体1的水平位置
            y1 = y1 + v1_y*t  # 物体1的垂直位置
            x1_all = np.append(x1_all, x1)  # 记录轨迹
            y1_all = np.append(y1_all, y1)  # 记录轨迹
            
            # 对物体2的计算
            a2_1 = G*m1/(distance12**2)
            a2_3 = G*m3/(distance23**2)
            a2_x = a2_1*(old_x1-x2)/distance12 + a2_3*(old_x3-x2)/distance23
            a2_y = a2_1*(old_y1-y2)/distance12 + a2_3*(old_y3-y2)/distance23
            v2_x = v2_x + a2_x*t
            v2_y = v2_y + a2_y*t
            x2 = x2 + v2_x*t
            y2 = y2 + v2_y*t
            x2_all = np.append(x2_all, x2)
            y2_all = np.append(y2_all, y2)
            
            # 对物体3的计算
            a3_1 = G*m1/(distance13**2)
            a3_2 = G*m2/(distance23**2)
            a3_x = a3_1*(old_x1-x3)/distance13 + a3_2*(old_x2-x3)/distance23
            a3_y = a3_1*(old_y1-y3)/distance13 + a3_2*(old_y2-y3)/distance23
            v3_x = v3_x + a3_x*t
            v3_y = v3_y + a3_y*t
            x3 = x3 + v3_x*t
            y3 = y3 + v3_y*t
            x3_all = np.append(x3_all, x3)
            y3_all = np.append(y3_all, y3)
        
            # 选择观测坐标
            axis_x = np.mean([x1, x2, x3])  # 观测坐标中心固定在平均值的地方
            axis_y = np.mean([y1, y2, y3])  # 观测坐标中心固定在平均值的地方
            while True:
                if np.abs(x1-axis_x) > observation_max or np.abs(x2-axis_x) > observation_max or np.abs(x3-axis_x) > observation_max or\
                np.abs(y1-axis_y) > observation_max or np.abs(y2-axis_y) > observation_max or np.abs(y3-axis_y) > observation_max:
                    observation_max = observation_max * 2  # 有一个物体超出视线时,视线范围翻倍
                elif np.abs(x1-axis_x) < observation_max/10 and np.abs(x2-axis_x) < observation_max/10 and np.abs(x3-axis_x) < observation_max/10 and\
                np.abs(y1-axis_y) < observation_max/10 and np.abs(y2-axis_y) < observation_max/10 and np.abs(y3-axis_y) < observation_max/10:
                    observation_max = observation_max / 2   # 所有物体都在的视线的10分之一内,视线范围减半
                else:
                    break
        
            plt.axis([axis_x-observation_max, axis_x+observation_max, axis_y-observation_max,  axis_y+observation_max])
            
            plt.plot(x1, y1, 'og', markersize=m1*100/observation_max)  # 默认密度相同,质量越大的,球面积越大。视线范围越宽,球看起来越小。
            plt.plot(x2, y2, 'or', markersize=m2*100/observation_max) 
            plt.plot(x3, y3, 'ob', markersize=m3*100/observation_max)
            plt.plot(x1_all, y1_all, '-g')  # 画轨迹的
            plt.plot(x2_all, y2_all, '-r')
            plt.plot(x3_all, y3_all, '-b')
        
            if len(x2_all)==1000 or len(y2_all)==1000:
                x1_all = np.delete(x1_all, [0]) #清除旧尾迹
                x2_all = np.delete(x2_all, [0])
                x3_all = np.delete(x3_all, [0])
                y1_all = np.delete(y1_all, [0])
                y2_all = np.delete(y2_all, [0])
                y3_all = np.delete(y3_all, [0])
                if len(plt.get_fignums())==0:
                    break
        
            plt.pause(0.001)  # 暂停0.00001,防止画图过快
            if len(plt.get_fignums())==0:
                break
        
            plt.clf()   # 清空
        

    1. 可以看程序中的print代码,保存图片时打印的。这里可以代表当前保存文件的个数。

      1. 我也是一样的问题,一运行就卡住,窗口无响应,只有控制台打印数字,图像看不到

        1. 图像保存为图片文件了,可以在代码文件所在的文件夹找找。或者设置下路径,再重新运行。

          1. 这样啊,就是卡才是正常的,把生成的图片制作的GIF动画才是最终的结果,我以为是实时预览的

            1. 嗯,不是实时预览的。因为一次的计算时长比较长,所以直接保存为JPG图片或GIF动画文件会更好些。其实更好的数据保存格式应该是文本格式,保存所有计算结果的坐标。

  2. 万有引力不应该是平方反比的吗?为啥作者计算加速度的时候distance没有平方呢?

发表评论

您的电子邮箱地址不会被公开。 必填项已用 * 标注

Captcha Code